Posts

Showing posts from March, 2021

MAIL MERGE IN PAGEMAKER

Image
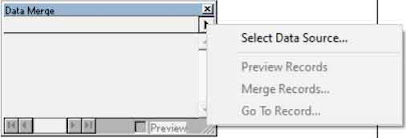
  MAIL MERGE IN PAGEMAKER We all know about Mail Merge feature in MS-Word. Like Word PageMaker also provides us the facility to Mail Merge which is here known as Data Merge.  Data Merge can be found under Window Menu - Plug-in Palettes - Show Data Merge Palette . When we click on Show Data Merge Palette we get a new Tool Bar on Screen as Data Merge. On Data Merge Tool Bar we have to click on Select Data Source. Where we get a dialogue box which provides option to choose a file with extension CSV or TXT.  For making a CSV file we can easily use excel and feed the data required accordingly.  Now type a letter which has to be commonly send or matter on which data is to be merged. Here I will explain Data Merge with an Example. I had fed the following data in MS-Excel & save it as .CSV in my computer. .CSV which I had chosen shows as .CSV (comma delimited) While entering data always start with the very first cell of the sheet. And first row will always contain the headings. As I have

CONVERTING TEXT TO TABLE

Image
 CONVERTING TEXT TO TABLE BEFORE LEARING CONVERTING TEXT TO TABLE LETS KNOW ABOUT SOME FACTS OF  TABLES IN MS-WORD Table by default have 2 Rows & 5 Columns. Maximum number of Columns that can be inserted is 63 Maximum number of Rows that can be inserted is 32767 Table can be converted to simple text & vice-versa, options are available in 1.    INSERT MENU - TABLE - CONVERT TEXT TO TABLE 2.   W hen we have our cursor on table we get option of CONVERT TABLE TO TEXT under LAYOUT MENU. For converting simple text to table you can use any symbol of your choice to make a difference between data. EXAMPLE NAME,CLASS,SEC RAM,10,A HARI,10,B LILA,10,A Simply select the above data and go to table tab under insert menu and click on convert text to table. You will get a dialogue box where you have to choose the separate text at if you have given any other symbol other than comma (,). In other you have to define that symbol. Else you simply press enter, you will se

HEADER & FOOTER IN MS-EXCEL

Image
HEADER & FOOTER IN MS-EXCEL MS-Excel also has the options of Header and Footer as there is in MS-Word. Here I would like to explain the Basic elements of Header and Footer in MS-Excel.  When we click on Header and Footer option in Insert Menu, we get a New Menu called Design. First Tab which we get under Header & Footer Design Menu is Header & Footer.   This is used to insert preset options given in the list to a document.  Second Tab - Header & Footer Elements .  Header & Footer opens up in a Page Layout view. It shows Ruler lines also and provides three spaces in Header & Footer area. Left, Center & Right.  It looks like: In these above given area we can fill the elements separately.  The options in elements are as follows: Page Number: This is used to Insert Page Number in the area given in Header of Footer. Number of Pages: This is used to insert the Total Number of Pages in a worksheet. Current Date: This is used to insert Current Date . But please note

HLOOKUP & VLOOKUP IN MS-EXCEL

Image
HLOOKUP & VLOOKUP IN MS-EXCEL HLOOKUP & VLOOKUP can be simply explained as Horizontally  and Vertically searching a data in a given range. There are more ways to use VLOOKUP & HLOOKUP. But this is the most simplest one which I have tried to explain here. This could  be easily understood by an example. Suppose their is a table containing the following: I had made this table in Sheet 2 of Excel.  Now in same sheet of Excel I want to know the marks of child in cells by only typing his or her name. We can put VLOOKUP formula for doing so.  In above we have to only change the value of A14 where RAM is written as soon as we will write another name properly.  The formula applied in the cell B14 is  =VLOOKUP(A14,A1:F11,2) Here in formula A14 is the cell the value which we have to search for A1:F11 is the range in which we have to search 2 is the column number which we want to see/display.  The same formula will be applied in the remaining cells but the value written as 2 will be

PRINTING TWO BANK DETAILS IN TALLY

Image
PRINTING TWO BANK DETAILS IN TALLY When we Print a BILL OF SUPPLY i.e. a sales bill we can activate to print our account details in the bill. But what if we want to print Two account details in Tally. For this we have to add a TDL file to our Tally which will allow us to print two account details in a Sales Bill. THIS SHOULD APPEAR ON THE BILL First of all we have to download a bank details TDL file (which you can download from internet). Place the file in a folder and copy its location by clicking on properties of the file. In security tab one can find the details of the file. Now open Tally and press CTRL+ALT+T to open TDL Management. Press F4 to enter Manage Local TDLs. Now in Tally 9.0 ERP you have to use CTRL+ALT+V to paste the file details. But in Tally Prime you can directly specify path and select the file.  THIS WILL APPEAR CTRL+ALT+T THIS WILL APPEAR -  F4 (Manage Local TDLs) Once your file is properly loaded restart your Tally now you can see a new option under Display - Mul